IACMS 三、後端部屬
LEMP堆疊
本步驟旨在於部署由 Linux、Nginx、MySQL、Php 所組成之堆疊,以建立伺服器可用之後端。
準備材料:已完成防火牆設定之樹莓派、個人電腦(須連上網路)
以 SSH 連線登入樹莓派伺服器
先輸入 sudo apt upgrade 進行系統更新
輸入 sudo apt install nginx,此時可以看到類似如下之提示(僅截取部分)
1 | Reading package lists... Done |
此信息為系統提示將會安裝之套件,並在看到如下信息處輸入 Y 以繼續安裝。
1 | Do you want to continue? [Y/n] |
打開網頁瀏覽器,輸入伺服器ip位址,應可見如下畫面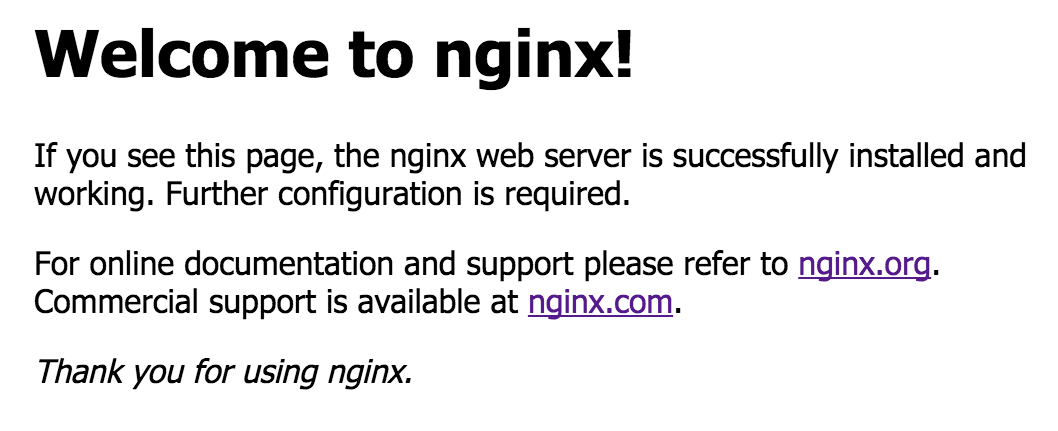
輸入 sudo apt install mysql-server 以安裝 MySQL 資料庫伺服器,並在完成安裝後輸入下方指令,進行 MySQL Server 之設定
1 | sudo mysql_secure_installation |
此時應可見如下提示,爲設定密碼強度檢查插件,輸入 y 並按下確認則表示使用該插件,若不想使用,則點按其他按鍵即可略過
1 | Securing the MySQL server deployment. |
若輸入 y 則應可見如下提示,0、1、2 分別表示不同強度的密碼檢查,本例則使用 0 即最低強度的密碼檢查。
1 | There are three levels of password validation policy: |
確認後,系統將提示設定 MySQL 服務之 Root 密碼,此密碼不同於系統之 Root 密碼,請審慎設定並牢記之。
1 | Please set the password for root here. |
待重複輸入並確認欲設定之密碼無誤後,系統將再次詢問是否要以剛才輸入之密碼進行設定,若確認則輸入 y。
1 | Estimated strength of the password: 50 |
之後系統將提示更多安全性之設定,爲保證伺服器運作之安全性,後續提示皆輸入 y 即可。
1 | By default, a MySQL installation has an anonymous user, |
最後輸入 sudo apt install php-fpm php-mysql 以安裝 PHP
更多參數資訊可參考官方說明文件 4.4.2 mysql_secure_installation — Improve MySQL Installation Security
其他可參考之教學文件 How To Install Linux, Nginx, MySQL, PHP (LEMP stack) on Ubuntu 20.04
反向代理的建立
本步驟將建立 Nginx 反向代理,使 Nginx 處理 Html 請求,而 Apache 處理 PHP 請求。
準備材料:已部署 LEMP 之樹莓派、個人電腦(須連上網路)
以 SSH 連線登入樹莓派
先更新套件庫
1 | sudo apt update |
安裝 Apache、PHP-FPM 和 ㄋfcgid 模組
1 | sudo apt install apache2 php-fpm libapache2-mod-fcgid |
Apache2 設定
更改預設監聽端口(80)為 8080 避免後續設定混淆
1 | sudo mv /etc/apache2/ports.conf /etc/apache2/ports.conf.default |
更改 Apache 預設虛擬主機(VirtualHost)監聽埠為 8080
先禁用預設設定
1 | sudo a2dissite 000-default |
複製預設設定檔,並從中修改監聽端口
1 | sudo cp /etc/apache2/sites-available/000-default.conf /etc/apache2/sites-available/001-default.conf |
找到開頭 <VirtualHost *:80> 字串,並將後面數字部分更改為 8080 ,再啟用修改後之設定
1 | sudo a2ensite 001-default |
重新載入 Apache
1 | sudo systemctl reload apache2 |
若 apache2 提示為不活化態,則將 reload 替換為 start
啟用 fcgid 模組
1 | sudo a2enmod actions alias proxy_fcgi fcgid |
重新載入 Apache
1 | sudo systemctl restart apache2 |
修改虛擬主機設定檔,以將所有 PHP 請求交給 PHP-FPM 處理,先以文字編輯器打開設定檔文件
1 | sudo nano /etc/apache2/sites-available/001-default.conf |
於頭尾兩 <VirtulHost> 間加入如下內容
1 | <VirtualHost *:8080> |
注意 php7.4-fpm 應修改為系統安裝之版本
測試設定無誤,則可執行下一步
1 | sudo apachectl -t |
重新載入 Apache
1 | sudo systemctl restart apache2 |
驗證 PHP 功能正常
1 | echo "<?php phpinfo(); ?>" | sudo tee /var/www/html/info.php |
前往 http://伺服器 ip:8080/info.php 檢查頁面是否正常顯示
Nginx 設定
移除 Nginx 預設啟用之網頁設定檔
1 | sudo rm /etc/nginx/sites-enabled/default |
新增設定檔,下例以 iacms 為檔名進行示範
1 | sudo nano /etc/nginx/sites-available/iacms |
將下面內容寫入檔案中
1 | server { |
注意將 server_name 更改為自己的伺服器名稱或域名,並將 php7.4-fpm 更改為系統安裝之版本,root 則對應至網頁目錄之位置
啟用新設定檔
1 | sudo ln -s /etc/nginx/sites-available/iacms /etc/nginx/sites-enabled/iacms |
測試設定,若無報錯則可進行下一步
1 | sudo nginx -t |
重新啟動 Nginx
1 | sudo systemctl reload nginx |
前往 http://伺服器 ip/info.php 檢查頁面是否正常顯示,並注意 PHP Variables 中 SERVER_SOFTWARE 部分應顯示為 Nginx
Apache 之 mod-rpaf 模組
為 Apache 安裝 mod-rpaf 模組,以將客戶端實際位址轉給 Apache 伺服器
※ 由於套件庫中 libapache2-mod-rpaf 版本老舊,此處將自行編譯
先安裝必要組件
1 | sudo apt install unzip build-essential apache2-dev |
下載源碼
1 | wget https://github.com/gnif/mod_rpaf/archive/stable.zip |
解壓縮
1 | unzip stable.zip |
進入資料夾中
1 | cd mod_rpaf-stable |
編譯並安裝
1 | make |
配置 Apache 使用 rpaf 模組,先新建先新建 rpaf.load 檔案
1 | sudo nano /etc/apache2/mods-available/rpaf.load |
寫入下面內容
1 | LoadModule rpaf_module /usr/lib/apache2/modules/mod_rpaf.so |
新建 rpaf.conf
1 | sudo nano /etc/apache2/mods-available/rpaf.conf |
寫入下面內容
1 | <IfModule mod_rpaf.c> |
啟用 rpaf 模組
1 | sudo a2enmod rpaf |
測試設定無誤並重啟 Apache
1 | sudo apachectl -t |
完成反向代理之設定
重新修改 Nginx 設定,將 PHP 請求交予 Apache 處理
1 | sudo nano /etc/nginx/sites-available/apache |
填入下面內容
1 | server { |
注意修改 server_name 及 root 之部分,location ~ /\.ht 部分為重要安全性設定
測試設定無誤並重啟 Nginx
1 | sudo nginx -t |
前往 http://伺服器 ip/info.php ,並注意 PHP Variables 中 SERVER_SOFTWARE 部分應顯示為 Apache,而 REMOTE_ADDR 應顯示為本機 ip 位址
可參考之教學文件為
LDAP 伺服器架設
本步驟將架設 LDAP 伺服器,以對使用者帳戶進行管理。
準備材料:已完成防火牆設定之樹莓派、個人電腦(須連上網路)
以 SSH 連線登入樹莓派,並更新套件庫
安裝 LDAP 套件
1 | sudo apt-get install slapd ldap-utils |
過程中提示輸入 Administrator password ,此部分可先隨意填寫,之後將會再做設定
設定 LDAP 伺服器
1 | sudo dpkg-reconfigure slapd |
系統將提示下列問題
- Omit OpenLDAP server configuration? 請選 No
- DNS domain name? 填寫伺服器將使用域名,若無域名也可填寫如 example.com 格式之名稱,填寫之值將用以建構 LDAP 伺服器之基礎名稱,十分重要,本例使用 iacms.net
- Organization name? 填寫組織名稱,本例使用 iacms
- Administrator password? 填寫管理員之密碼
- Remove the database when slapd is purged? No
- Move old database? Yes
測試 LDAP 連線,應可見顯示 anonymous
1 | ldapwhoami -H ldap:// -x |
參考文件為
How To Install and Configure OpenLDAP and phpLDAPadmin on Ubuntu 16.04
SMTP 伺服器架設
本步驟將架設簡易 SMTP 伺服器,方可進行電子郵件之發送。
準備材料:已完成防火牆設定之樹莓派、個人電腦(須連上網路)
以 SSH 登入伺服器,並更新套件庫
安裝相關套件(postfix)
1 | sudo apt-get install mailutils |
系統提示下面畫面時,選擇 Internet Site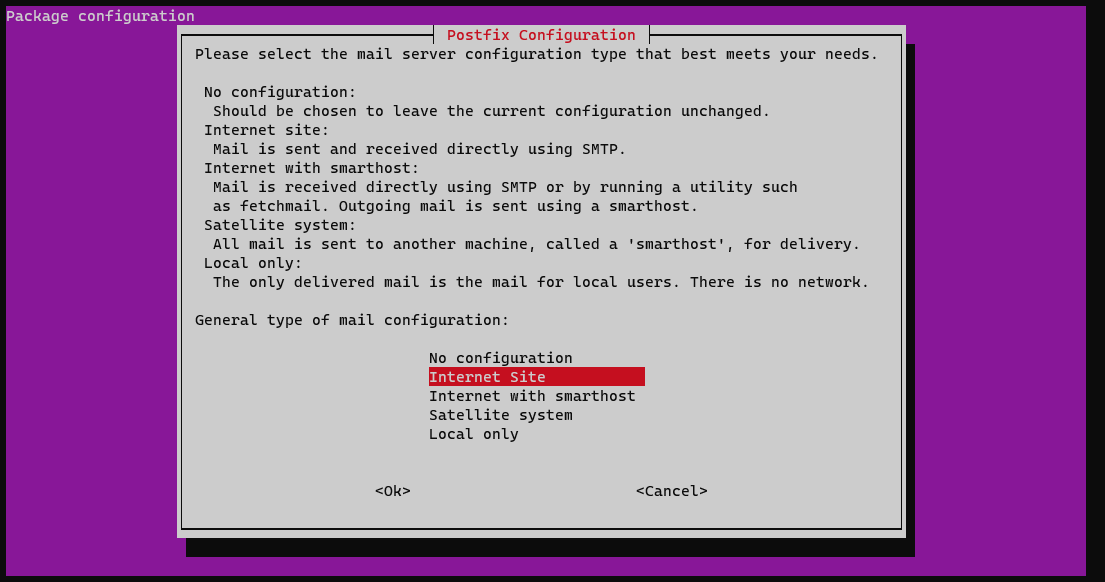
之後於 System mail name 之欄位填入伺服器之域名
測試發信功能是否正常
1 | echo "你好嗎 ?" | mail -s "測試信" [email protected](您的電子郵件信箱) -aFrom:[email protected] |
檢查填入之電子郵件信箱,應可以找到寄出之郵件